Followers

Thursday 21 May 2015

Using the ICOM Bluetooth Unit with the ID-5100

How I use the Icom Bluetooth system in my car


Some Radio Hams have been discussing the effectiveness of the Bluetooth extension microphone with the ID-5100 DStar transceiver on the ID-5100 Facebook Page. I thought I would share what works for me.

The small speaker cost £8 from Maplin Electronics in the UK. The microphone used is the built-in electrec microphone - where both work really well!

So, how to connect the speaker? The Icom Bluetooth unit has a 3.5mm socket, for an external speaker, at the opposite end from the USB charging socket. I use an audio extension cable (stereo 3.5mm at both ends) which connects the speaker with the extension socket. It is an easy job to hide the cable out of the way.

The speaker itself is rechargeable, although I plug it into the nearby 12v socket when I want to use it, and is NOT, of course, Bluetooth. That's why it is so cheap!

Works for me - I hope you like the audio?

73 de John G0GCQ


Friday 15 May 2015

HF Digital Voice - using FreeDV

Rowetel SM1000 Unit


I hope to be experimenting with this clever little unit in the coming days, once the leads are made up.


I'll update you all as soon as it is up and running.

73 de John

Tuesday 5 May 2015

Getting mobile again on the 70MHz (4m) Amateur Band

My 4m Band History To Date


In my radio shack I use an ICOM V200T PMR (Private Mobile Radio) rig, putting out around 30W, for my 70MHz or 4m radio activity. I have a professionally manufactured Jaybeam folded dipole above the roof line as an aerial. It is particularly good as it comes complete with a balun and is very well manufactured. I think I purchased the aerial in 1990 - and it has served me well ever since.

I have other PMR rigs in the cupboard - as I used to be very active and enjoyed converting many of them to the Amateur bands. I started using the 4m band in 1989 using a crystal controlled Telefunken radio which I converted from a German Fire Engine - as they were moving away from crystals and on to VFOs (Variable Frequency Oscillators).

It has, however, been about 4 years since I have had a 4m transceiver, or 'rig', in the car and, as the band seems to be getting more popular in this part of the UK once again, I thought it was time to put that right!

Of course, the one 4m remote-head rig I already owned was limited to 20W and had an annoying 90 second time-out timer, which I could not reprogram, so I wanted to use something with a bit more power out! I still have my Pye 4m amplifier but I wanted to cut down on space and wiring in the car - especially as a modern car can be less roomy for all that gear.

A Solution For Mobile Operating


In the UK it is possible to purchase a 'Quad Band' transceiver covering 4 Amateur Bands: 6m, 4m, 2m and 70cm. I purchased mine from the Martin Lynch Group in Staines, London.

This gave me a remote head option capable of running up to 50W of power out to the aerial. Such power would be just right for mobile operation!


It also means that I can occasionally use the 6m band from the car. I already have access to 2m & 70cm band (analogue & digital) from my ICOM ID5100E in the car. You can see the head unit of the ID5100E above the corresponding head unit of the Quad-Band radio in the photo above. This means both radios are very easy to operate from the driving position.


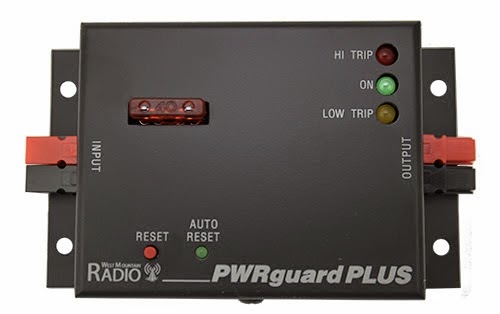
Now, how to power two radios from one heavy-duty socket in the boot of the car ('trunk' for my Stateside readers!) in a safe manner? Well, I am a great supporter of West Mountain Radio products and PowerPoles, so the top photo shows you the fused system I use to accommodate two radios running at the same time. 

The second photo shows the unit in situ, next to the main unit for the ICOM ID5100E radio. You can see the 12v socket clearly feeding the RigRunner. It works a treat!


Here you can see the 4m aerial situated at the back of my car. It is centre loaded, to make the physical height of the aerial smaller whilst maintaining the same electrical length. It works incredibly well!

I have already worked a few stations whilst travelling around Kent and I expect to work a more over the coming weeks.


Here you can see the 4m aerial on the left & the dual-band 2m/70cm aerial on the right - at the rear of my car.

Hope you found that interesting?

More later!

Best 73 de John G0GCQ

Saturday 11 April 2015

First Dry Run of Portable HF Station

Putting it all together in the rear garden


9m tall Prowhip aerial erected in rear garden ~ tunes on all the Amateur HF ('Short Wave') bands.


Solar panels charging sealed lead acid battery ~ Yaesu FT450D HF radio on white folding table.  


This is my 6-year old sealed lead acid battery ~ used as a spare as the leisure battery is being charged.
The solar panels are working really well ~ allowing me to run 100 Watts output from the radio. The battery is being topped-up as it is being charged at 40 amps via the solar panels. 


Front view ~ note aerial coaxial cable off to the vertical antenna. Cable is 24 feet long, which helps with the tuning process for the vertical aerial on Amateur Radio HF bands.


Yaesu FT-450D radio ~ using a Heil Hand Mic for good audio response & driving of the rig (to get high power output ~ closer to 90W on peaks).


Even though the bands were not very good, due to a recent solar flare that knocked out HF communication to some extent, the radio did pick-up many Italian & German Radio Amateur Stations.

Friday 3 April 2015

First Stage of Battery Box Completed

The Battery Box ~ as received:


Top Cover (Left to Right): -ve terminal / 12v socket / Battery Charge Level LED Module / Off & On switch / +ve terminal


Webbing belt in place ~ keeping lid in place.


Underneath of lid ~ main HT wiring to battery (top right) / terminal posts & rear of LED meter + 12v socket at bottom of photo.


Close-up of the LED meter, with 12v socket to left & switch to right.

Modification to the Box:


I have removed the garish & unnecessary label off the box and then bonded the PWRguardPLUS onto the side of the battery box.

I now have to complete the wiring to the 12v terminals & attach the Anderson poles onto the appropriate 12v radio wires.

Another day for this ...........

73 de John

Wednesday 1 April 2015

What About Battery Power Arrangements?


This Numax 'all-in-one' battery power box is a unique 12 volt power station that quickly, easily and safely stores and distributes power from a 12 volt marine battery directly to your appliances.

The battery is stored inside the impact resistant polypropylene battery box and connected up to the internal battery leads. These battery leads run through a battery switch and on to multiple power outlets found on the battery box lid.

The power outlets consist of a positive and a negative wing nut thread for eyelet terminal connection and a 'standard' 12 volt socket connection.

The Numax Accubox battery box also comes equipped with a battery power meter that displays the power condition of the installed battery with an LED display. This allows you to have a general idea as to the power left in the battery while out and about.

The box is designed to help you transport a battery during your leisure activities helping to ensure the potentially hazardous battery chemicals do not come in contact with your clothes. It will enable you prepare and store your battery at home, lift (with the lifting handles) and transport your battery more safely and use your battery more quickly, easily and safely during the day.

This boat battery box also comes complete with a robust nylon support strap with a metal buckle and is suitable for up to 110ah batteries.

Internal Length 356mm
Internal Width 208mm
Internal Height 228mm
Box Length 380mm
Box Width 230mm
Box Height 235mm

Current Rating 100 amps


By placing the battery inside this box, I will not be in any danger of spillage & connections will be easy and straightforward. 

I also like the meter + the switch :-)


To make this arrangement more effective, as I would not want to allow the battery to go below the 50% charge level, I ordered the West Mountain Radio PWRguardPLUS which I shall mount to the side of the battery box.


This piece of kit gives me:

  • Automatic safety switch turns off if voltage exceeds 15 volts or drops below 11.0 volts, turns back on when voltage in safe operating range
  • Momentary voltage dips below 11.0 volts are ignored to prevent false tripping while transmitting
  • Programming of custom trip limits available, contact sales for details
  • Rated for 40 amps maximum while transmitting, 30 amps continuous duty
  • Soft turn-on / turn-off solid state switch protects radio and reduces in-rush current...no relay contact bounce!
  • Indicator LEDs and audible alarm notify user when safety switch turns power off. Buzzer may be disabled by user
  • External sense input can be wired to a switch or low voltage (3-5 volt) DC input. May be used for:
    • Keyswitch to prevent rig use during antenna repairs or when unattended.
    • Cut power based on a sensor input such as a water alarm.
    • Power up based on a sensor such as light detector or low current switch.
  • Uses Anderson Powerpole® connectors
  • Dimensions: 1.25" H x 4.5" W x 2.75” D

This means that I can permanently connect the PWRguardPLUS to the side of the battery box, bearing in mind it has a switch, so all I will need to do is to push the Anderson PowerPoles, attached to the rig 12v cable, into the West Mountain Radio unit & it will all be set ready to rock’n’roll :-)

I can attach the solar panel kit onto the battery within the box.

All sounding rather exciting :-)


73 de John

Monday 30 March 2015

A useful addition to the kit required for portable HF Operating

Dunelm Mill ~ Ashford, Kent


A nice folding table for operating portable HF ~ plus holding a mug of coffee & a logbook. Not bad for £5 :-)

I already have a folding chair ;-)

73 de John