Followers

Friday, 3 April 2015

First Stage of Battery Box Completed

The Battery Box ~ as received:


Top Cover (Left to Right): -ve terminal / 12v socket / Battery Charge Level LED Module / Off & On switch / +ve terminal


Webbing belt in place ~ keeping lid in place.


Underneath of lid ~ main HT wiring to battery (top right) / terminal posts & rear of LED meter + 12v socket at bottom of photo.


Close-up of the LED meter, with 12v socket to left & switch to right.

Modification to the Box:


I have removed the garish & unnecessary label off the box and then bonded the PWRguardPLUS onto the side of the battery box.

I now have to complete the wiring to the 12v terminals & attach the Anderson poles onto the appropriate 12v radio wires.

Another day for this ...........

73 de John

Wednesday, 1 April 2015

What About Battery Power Arrangements?


This Numax 'all-in-one' battery power box is a unique 12 volt power station that quickly, easily and safely stores and distributes power from a 12 volt marine battery directly to your appliances.

The battery is stored inside the impact resistant polypropylene battery box and connected up to the internal battery leads. These battery leads run through a battery switch and on to multiple power outlets found on the battery box lid.

The power outlets consist of a positive and a negative wing nut thread for eyelet terminal connection and a 'standard' 12 volt socket connection.

The Numax Accubox battery box also comes equipped with a battery power meter that displays the power condition of the installed battery with an LED display. This allows you to have a general idea as to the power left in the battery while out and about.

The box is designed to help you transport a battery during your leisure activities helping to ensure the potentially hazardous battery chemicals do not come in contact with your clothes. It will enable you prepare and store your battery at home, lift (with the lifting handles) and transport your battery more safely and use your battery more quickly, easily and safely during the day.

This boat battery box also comes complete with a robust nylon support strap with a metal buckle and is suitable for up to 110ah batteries.

Internal Length 356mm
Internal Width 208mm
Internal Height 228mm
Box Length 380mm
Box Width 230mm
Box Height 235mm

Current Rating 100 amps


By placing the battery inside this box, I will not be in any danger of spillage & connections will be easy and straightforward. 

I also like the meter + the switch :-)


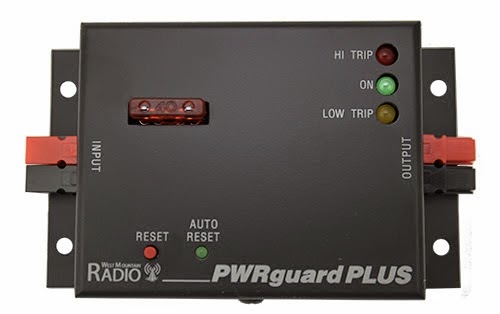
To make this arrangement more effective, as I would not want to allow the battery to go below the 50% charge level, I ordered the West Mountain Radio PWRguardPLUS which I shall mount to the side of the battery box.


This piece of kit gives me:

  • Automatic safety switch turns off if voltage exceeds 15 volts or drops below 11.0 volts, turns back on when voltage in safe operating range
  • Momentary voltage dips below 11.0 volts are ignored to prevent false tripping while transmitting
  • Programming of custom trip limits available, contact sales for details
  • Rated for 40 amps maximum while transmitting, 30 amps continuous duty
  • Soft turn-on / turn-off solid state switch protects radio and reduces in-rush current...no relay contact bounce!
  • Indicator LEDs and audible alarm notify user when safety switch turns power off. Buzzer may be disabled by user
  • External sense input can be wired to a switch or low voltage (3-5 volt) DC input. May be used for:
    • Keyswitch to prevent rig use during antenna repairs or when unattended.
    • Cut power based on a sensor input such as a water alarm.
    • Power up based on a sensor such as light detector or low current switch.
  • Uses Anderson Powerpole® connectors
  • Dimensions: 1.25" H x 4.5" W x 2.75” D

This means that I can permanently connect the PWRguardPLUS to the side of the battery box, bearing in mind it has a switch, so all I will need to do is to push the Anderson PowerPoles, attached to the rig 12v cable, into the West Mountain Radio unit & it will all be set ready to rock’n’roll :-)

I can attach the solar panel kit onto the battery within the box.

All sounding rather exciting :-)


73 de John

Monday, 30 March 2015

A useful addition to the kit required for portable HF Operating

Dunelm Mill ~ Ashford, Kent


A nice folding table for operating portable HF ~ plus holding a mug of coffee & a logbook. Not bad for £5 :-)

I already have a folding chair ;-)

73 de John

Saturday, 28 March 2015

Getting everything ready for portable HF operating ~ Part 2

Vertical Aerial


The Prowhip vertical aerial that I use is based on a fibreglass fishing pole which is less than 1.3m collapsed and 9m extended. Link HERE.


The aerial wire, shown here in red, travels up the fibreglass pole as you extend it to its fullest length. The wire is captured at the tip end, so no threading required!

At the bottom of the aerial you can see an UNUN ~ which allows an unbalanced piece of wire, as shown here in red, to join with a length of 50 Ohm coaxial cable to the radio, without the signal from the radio feeding straight back & frying it. This way, the aerial can be electrically tuned ('cut' to length electrically) using an aerial tuner ~ allowing the maximum signal to get out into the ether and around the globe :-)


Here, at another location from my own, you can see the vertical aerial fully extended ~ 9m ~ mounted on the aluminium post (shown behind the aerial in the photo just above this one). The coaxial cable feeds from the bottom of the UNUN to the rear of the radio.

Yesterday, at this location, I was able to tune the radio on all the HF ('Shortwave Bands' = High Frequency) bands that we can use, including the additional 6m band (50MHz) that we have access to here in the UK.

Stations worked included one in the Azores on the 20m (14MHz) band, which was not particularly 'alive' as conditions were electrically noisy (recent Solar Flares).

I am very happy with this aerial & await using it further this Summer :-)


Yaesu FT-450D HF Transceiver


This is the transceiver that I intend to use whilst out and about working HF portable. It is a very good (smallish) size, whilst maintaining good ergonomics, power and facilities. The internal tuner works very well with the vertical aerial mentioned in part 1.

I will be writing more about this little gem another time.

That's it for now :-)

73 de John G0GCQ

Getting everything ready for portable HF operating ~ Part 1

Solar Power Kit


The 40W @ 12V solar power kit arrived today ~ actually, the Post Office tried to deliver it yesterday but we were out in Canterbury. That means it could have arrived within 24 hours of ordering the kit! It was very well packaged and arrived safely.

The standard USB memory stick is on the floor to give you a sense of scale.


The whole system folds up into a case & the panels themselves are protected by the external case that the whole unit slides into. It is a very well made case ~ soft on the inside with some protection to the outside. The handle, attached to the panels' aluminium frame, is very substantial and secure.


The solar panels are hinged together and can be angled to suit the external conditions of the day.


The rear of the panels shows the voltage regulator, also limiting the power generated to 10 Amps, and the cable/clips to attach to the leisure battery (not shown). You can also see, at either end of the panels, the adjustable legs that support the unit to point effectively towards the sun ~ for maximum power generation.

I haven't tried the unit outside yet, so I have not checked that it is able to work effectively in daylight/sunlight ~ not the best day today, as we have had some fine mist/drizzle so far!

That's Part 1 :-)

73 (morse code for 'Best Wishes') de John

Callsign: G0GCQ

Friday, 27 March 2015

Prowhip Vertical HF Portable Aerial

https://www.prowhipantennas.co.uk/index.php?option=com_virtuemart&view=productdetails&virtuemart_product_id=54&virtuemart_category_id=6

Using the lower radio bands ('Shortwave Bands') from a portable location takes some planning. You obviously need a radio, but you also need a lightweight, easy to erect and take down, portable and efficient aerial. That aerial also needs to be able to electrically tune to the several 'bands' that we Radio Amateurs use.

I could have made a similar aerial but, after much research, I found that I would not be saving any money & the 9m vertical aerial from Prowhip is tried and tested.

I shall be posting some photos later and give you a 'user's view' of how well the aerial works - although, on first testing, it seems to be very efficient & effective.

73 de John

Wednesday, 25 March 2015

Long Time No Post

Crumbs! I forgot I had this blog!

Luckily, as I am about to start High Frequency (HF) mobile working as a Radio Amateur, I can use this blog as a record of my experiences ☺

I have recently joined the Worked All Britain Award Group, where I will be working HF ('Shortwave Bands') from different locations in Kent & Sussex, trying to cover as many 'squares', based on the Ordnance Survey mapping system in the UK, as I can. Some of them are quite rare - as nobody usually lives there or they are very difficult to reach.

I intend to start blogging about the equipment I will be using: the radio, the aerial, the power source and the solar power kit. I will be taking photos and videos  to show you how I get on.

Until then - Best 73 de G0GCQ