Followers

Monday 1 November 2010

Redesigned the Shack

The Shack is the name given to a Radio Amateur Operating Room.


The trouble with any working environment is that, after a few years, they get cluttered and disorganised.  In the end you just don't have an efficient working 'hobby' area.  That, dear reader, is what happened to me!  So it was time for a grand 'sort-out' and rationalisation.

So, starting from the left and working round in a clockwise direction, here is a glimpse of the shack as it is now organised:

Hand-held radios charging on the left ~ next to the Raid 2Tb Back-up NAS server. Spider-man is sitting on the main PSK/other data modes computer, next to FM radios for 2m / 70cm / 6m bands.
To the right of the picture you can see my 6m 100W amplifier, with the 6m rig to the right (underneath) & with the scanner on top of that (Marine & Airband). On top of that is an eePC Netbook on qrz.com ~ for quick checks on who I am talking to worldwide.

Another view of the end of the shack. Note that the aerial cables have yet to be pinned back into position. Linux computer for surfing, etc., to the right of picture.
Between both screens is the main HF Radio & Aerial tuner (underneath). Main radio power supply is fixed on top of the dual-boot Linux & Windows 7 PC.

Top shelf shows DC Power Distribution System, 'drop-in' for SATA Hard Drives, 2m / 70cms / 4m FM radios, White BT Broadband Phone on top of aerial rotator. Handheld radios stored on right hand side. You can see through to my office PC.

Various hand-held radios & portable scanner stored. Through archway you can see my office PC running Windows 7 only.

Quad machine with 6GB of memory ~ keeps me going! Network colour laser printer just out of shot to the right of picture.

So there you have it!  A much better shack to use ~ with everything at my fingertips.

Now all I need to do is to sort out the music and video server on the other side of the house!  That's another blog for the future.

Monday 27 September 2010

Winterising Aerials For The Harsh Weather Ahead

John (M1FEL) and I, a week ago, were taking down the main aerial pole in order to re-attach the full-size Windom HF Aerial ~ as the rope had finally perished.  It was last checked a year ago!
The main HF Windom attaches to the pole seen on the right-hand side
I took the opportunity to winterise the folded 4m band (70MHz) dipole, which you can see reaching out to the left of the main HF pole, to make sure that the internal balun would not see any ingress of water.  All the connections were great from last year but, to make sure, I replaced the rubberised self-amalgamating tape and cable ties.  At the same time, I attached a stainless steel 'Discone' aerial on top of the main HF pole.  Now I can hear the controller (and not just the aircraft overhead) at Lydd Airport & also at Laschenden (Headcorn) aerodrome.  Great improvement!


If you notice, there are other poles sticking up above the small flat roof that my wife & I have.  Looking at the white fibreglass aerial 'nearest' the TV aerial on the chimney, you can see my main 2m (145MHz) & 70cms (433MHz) aerial: 

X510HDN Base Antenna
Specifications:
Band:2m/70cm
Element Phasing:3-5/8l/8-5/8l
Gain (dB):8.3/11.7
Watts:330 (2m) / 250 (70cm)
Connector:Type-N
Weight:5 lbs.
Length:17.2'
Max Wind Resistance:90 MPH


It is really an effective aerial and the coverage is phenomenal from up here!  I am really pleased with this.

X510HDN Base Antenna is the white 'stick' on the right hand side.
The pole to the left of the X510HDN holds a 10m (28>29MHz) fibreglass aerial for DX and Ground Wave working.  When conditions are right, I use this aerial for 10m FM DX (long distance) contacts.  Very efficient, with no measurable reflective power ~ so all power from the radio is effectively radiated from the aerial itself.  All feeder cable to my aerials are 'top-notch' military UHF (Ultra High Frequency) 'spec' ~ which is overkill for the 10m band, but there is minimal loss through the cable!

Finally, the pole on the left-hand side of the photo above shows a 3-element 6m (50MHz) horizontal beam, on top of a rotator, allowing me to turn the aerial to face DX stations around the World.  Above it is a V2000A Tri-band Base Antenna:

Specifications:
Bands:6m/2m/70cm
Frequency (MHz):52-54/144-148/440-450
Gain:2.15dBi/6.2dB/8.4dB
Impedance (nominal):50W
VSWR:1.5:1 (typical)
Power Rating:150 watts
Element Phasing:1/2l/2-5/8l/4-5/8l
Max Wind Rating:112 m.p.h.
Mast Dia. Acceptance:1.2 to 2.4 inches
Length/Weight8.3 ft./2.6 lbs.
Connector:SO-239 Female

This, again, is a very efficient aerial ~ one that I use for 'local' nattering on 6m / 2m / 70cms!


Hanging just this side of the Kent Cobnut Tree is the white centre balun of the HF Windom Aerial.


The other end of the Windom aerial is held aloft by the use of an ex-military high-grade aluminium telescopic mast.
The telescopic pole can be seen extended just beyond the white reclining seat.
You can see the radiating element, the vertical cable running down from the large white balun held aloft, running towards the pump house and then into the main property.  High-grade coaxial cable, again, but the distance from the 'Shack' (Radio Room) to the main feed point is only 30 feet. Nothing for the HF ('Short Wave') bands!


So there we have it!  Ready for the Winter ahead!  Here's hoping for some choice contacts on the Amateur Radio bands.

Sunday 5 September 2010

Shackbox Air ~ Linux Operating System for Radio Amateurs

So why Linux?  Why Shackbox Air?
The Data Operating Area Of My Amateur Radio Room ("Shack")
For those of you interested in computers and operating systems, I first started using Linux after a couple of years playing with IBM's OS2 operating system ~ way back, in computer terms, to about 1990 ..... frightening!

I started with SUSE Linux after OS2 stopped being supported (a missed opportunity by IBM, in my view  ~ just look at Apple now!), version 3 I seem to recall???  In any case, from the early 1990s I have been running Linux somewhere in the house ~ usually in more than one place.  Who said "Geek!" ???

http://shackbox.net/ is the latest Linux software to be tried in my "shack" (radio room) ~ which links two of my hobbies together: Amateur Radio and Computing.

Linux is far more stable than windows.  Apple know this, which is why their OS (operating system) has been developed from earlier versions of the software you can get for FREE ~ namely Linux!!  There are several 'flavours' of Linux, in much the same way as there are many car manufacturers (automobile for my American readers) .

The point about Linux, however, in all its guises, is that they all operate using the same main engine.  They may be tweaked and tuned slightly differently, with many of them looking cosmetically different (colours and the type of user interface are two examples), but they all work in a very similar fashion.  More importantly, they are all FREE !!!!

Another benefit is that older PCs can run more efficiently on Linux than they can using Windows ~ as the specification needed to run a fast and efficient Linux system is not as great as for the Windows OS family.  This means that you can breathe new life into an ageing machine, have more for your Buck so to speak, and save the planet at the same time!  A Win Win Win situation!

For me, it means that I don't have to 'tie-up' an up-to-date computer with tasks that can be easily handled by an older PC running Linux.  With all the programs being free (Open Source) and with such a great selection of written, tried and tested software available, it is just a 'no-brainer' in my book.

So that is why I use Linux in my Radio Room ("Shack"):

A Huge Collection Of Amateur Radio Software Is Already Included
Clicking On The Antenna Design Folder Shows Many Tools Available ~ Included As Standard!
There Are Plenty Of Programs Available Within The Electronics Folder As Well

This version of Linux also contains the usual 'Office', 'Graphics' and other common Linux programs.

Until next time, when I will develop the reasons why a FREE Linux OS may benefit you.

Change of Aerial and repainting mobile mount

A couple of days ago I received my new Diamond NR-790 Mobile aerial (Antenna for my USA readers) to replace the one I borrowed from my friend John (M1FEL).

Diamond NR-790 on car
You can see that this is the Mark II model ~ now using two heavy-weight closed coils.  The 2m band (145 MHz) sees the aerial as a 6/8th wave device (giving 3.7 dBi @ maximum of 300W power out of the radio) whilst the 70cms band (433 MHz) identifies the aerial as 3*5/8th wave device (giving 6.4 dBi @ maximum of 250W power out of the radio).  The aerial is able to handle more than I require, but it is substantially made and has already given fantastic results (see below).

The base below the black 'collar' is much improved
The photo above shows the lower part of the aerial.  Between the mount, i.e. bottom of the aerial, and the first black collar is an important part of this aerial's success: it is a built-in 'ground-plane' ~ ensuring that the aerial is really efficient when it comes to 'matching' the frequency in use.  This section is much larger than the Mark I version ~ probably to handle the extra power ~ but also because the matching has been improved.  The aerial performs as least as well as the Mark I, maybe better?

Painted aerial mount
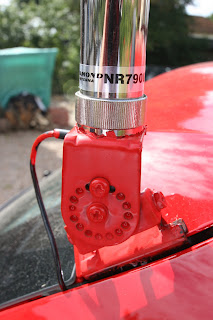
If you look at an earlier post, you can see that the aerial mount had to be modified ~ leaving it a mixture of black & silver, with a touch of bronze!  I'm not usually worried about looks but, on this occasion, I thought I would paint it all black, using enamel bought from a local shop.

Needless to say, they did not have black!  Henry Ford would be turning in his grave, I thought, but then I saw a pot of red enamel.  The rest you can see for yourself!  I think it looks better ~ even though I have to clean the red enamel off the wire later!

As for the efficiency of the aerial?  Using 5 Watts of power from the radio, I can talk for miles on 2m (145MHz band) ~ not using a repeater I quickly add ~ and I had a similar reaction when using 5W on 70cms (433MHz band), despite going into dips, under tunnels of trees, etc.  Quite amazing!

John (M1FEL) and I will continue to carry out tests on the efficiency of the aerial over the next few days.  Our test for tomorrow will be to see how far we can work each other using 5W on 433.375MHz.  

More anon............ so watch this space!

Sunday 29 August 2010

Adapting the aerial mount on the car

The trip up to South London, from the Kent / East Sussex Border, in the new car on Friday was fine ~ but I noticed that the (usually reliable) aerial mount (antenna for our American friends) was not able to keep the aerial vertical.  It had that slightly 'swept back' look about it.

Adapted Mount

Luckily for me, that kind Radio Amateur John (M1FEL), who lives nearly 1/4-mile from me, has a grinder, drill and a selection of new BA bolts.  You can see that we removed the central locknut and knurled wheel affair and, instead, used a couple of bolts.  The top bolt stops the bracket from rotating (Left <> Right in the photo), which was the main problem, and the central bolt stops the bracket from coming apart.

'Inside' of the bracket
The aerial I am using, you may recall from a previous blog, is the Diamond dual-band NR-790.  This is an excellent aerial ~ allowing me to work John over 50 miles simplex on 145.375MHz (2 metre band) despite great lumps of chalk (including Wrotham Hill) in the way! An excellent piece of kit!  All I need to do now is paint the exposed metal matt black ~ probably Humbrol enamel.

Radio fitted in 'bin' below 12v supply
The radio was, quite simply, the easiest to fit in a long while. Conveniently, the estate car has what I can only describe as 'bins' either side of the tailgate.  The one on the nearside has ample room for the radio (good for circulation & cooling qualities)  ~ benefiting from the cigarette-lighter socket (rated at 20 Amps) above.

Offside ~ showing aerial cable
The other bin is not being used for any radio gear!  The photo above, however, does show you how the aerial cable, mostly hidden underneath the boot space close to the spare wheel, exits the car and runs up the tailgate channel ~ eventually meeting the bracket.

Radio remote head & microphone
The photo above shows the remote radio head in position under the Radio / CD / iPod controller.  You can see the storage position of the Bluetooth headset.  This configuration means that there is only one wire visible from the back of the car to the remote head.  Quite neat!

The rig ~ showing the local 'natter' frequency in MHz
If you look at the above photo closely, where the Bluetooth headset docks with the remote head (just where it says 'Dual'), you can see the blue light on the Bluetooth headset.  That is showing that it is fully charged.  The good thing is, even when the radio is turned off, the Bluetooth headset continues to be charged ~ showing a red LED when doing so.  Clever, eh?  The headset has power for just over 3 hours continual use.  Good enough for me!

'Bumper' sticker from the States
So I am steadily getting the car the way I want it.  Till next time dear friends!

Wednesday 25 August 2010

The new car arrives!

So ~ the new car has arrived!  Finally, after leaving the garage in Ashford, I arrived home at 11am this morning.


I am very pleased with the car.  It is the new Fabia Estate variant ~ the 105bhp 1.6 Turbo diesel 'straight-4' engine ~ made in the Polish factory two weeks ago!

They have improved the on-board computer & the display (it was already excellent) and also the radio / CD / iPod player display.  I like the fact that I can fully control the iPod from the radio itself ~ music-wise, that is.


The engine is quite quiet, very economical and, best of all, is incredibly efficient!  Driving around Ashford this morning registered 58.8 mpg!  It should be around 65 mpg at least on a longer journey ~ great!


My friend John (M1FEL for those Radio Hams amongst you) kindly took all these photos for me!  We then 'hatched a plan'.  How long could we wait before putting in the Ham Radio 'rig' and attach the aerial?  We planned for after lunch!

Then the rain came down in buckets ................

It didn't put us off!


The remote 'head' for the radio, which is fitted in the boot & uses the 20 Amp 12v socket at the back.  All fully fused, etc., drawing only 12 amps on full power.  This is fitted on a small metal bracket, thanks once again to John (M1FEL).  The clip to the bottom left-hand side of the 'head' is the recharging clip for the Bluetooth headset.


As it was still tipping down with rain, you can see that I am wearing my 100% waterproof jacket ~ but the important bit (really!!) is that I am wearing the Bluetooth headphone/microphone.  This is totally 'hands free' and very safe!


You can see that we fitted the aerial (a Diamond dual-band aerial for 2m & 70cms bands) ~ a mere 1.4m tall ~ works well!  Thanks to John (M1FEL) who lent me his aerial as it performed better than my (shorter) one.  Who says size doesn't matter?

Everything is working well!  Great!

My grateful thanks to John, of course, without which I would not have the radio 'up and running' within 4 hours of getting the new car back home!

Until next time ............

Sunday 22 August 2010

Shoreham Air Show 22-08-2010

I had been looking forward to attending this airshow all year!  The 70th anniversary of the Battle of Britain & the 100th anniversary of Shoreham Airport (oldest commercial airport in the UK) ~ so a special trip.

I have not invested in a 400mm Canon Digital IS lens as yet, that will have to wait until next year, but I do have the 200mm variant. I also took with me my trusty Canon EOS 20D and the latest Tamron wide angle lens for close shots in and around the static display.

I set the ISO to 400 as the day was *very* misty ~ with low cloud base between 90 and 300 feet ~ mostly seemed to be about 150 feet.  Lots of heavy showers peppered with that drizzly mist that just lingers. Ugh!  I set the speed setting to 125/sec so as not to freeze the propellers in flight ~ I wanted to see 'spinning' movement!

I managed to take a couple hundred shots even though the flying was cut back to virtually nothing.  I felt so sorry for the organisers, stallholders & event participants ~ they must have put so much into the organisation and preparation of the show.  If it hadn't been for the weather, it would have been a fantastic day out!

The first flying event ended in disaster!  You can see that the tip of the left wing took the initial force of the impact.  Just as well as, in my opinion, the glider was released too low to the airfield (cloud cover being so low, I expect) ~ turned to lose speed and face into the wind ~ and then seemed to 'stall'.

This, naturally, meant that the flying display was put back by at least an hour whilst the ambulance carried the injured pilot to Worthing Accident & Emergency hospital + photo forensics were taken from the Police Helicopter.  After the runway was cleared, we carried on the limited flying. Rain, rain and more rain!!!

Overall a great day ~ but a pity our typical British August weather got in the way!  Oh well, maybe I will be able to attend next year?
This shot shows you a Mark 2 Hurricane B flying along runway 20 @ Shoreham Air Show 2010.

Saturday 21 August 2010

Getting ready for the new car


I have used many Amateur radios in my cars over the last 27 years: covering the HF (Shortwave) bands right up to 1.2GHz (23 cms) band.

Sometimes I have had four different rigs in the car at the same time!

I have now reached the stage where I *think* I only need one radio in the car! The most common Amateur Radio Bands in use, for mobile working, are definitely those in the '2 metre' (145 MHz) and '70 cms' (433 MHz) range. I have a dual-band radio ('rig') that is quite small and yet powerful.

The rig runs at 50 Watts on the 2 metre band and 40 Watts on the 70 cms band. That is to say, the amount of radio 'energy' that leaves the rig has a maximum of 50 or 40 Watts. The rig can transmit at lower powers!

Luckily for me, this rig has the ability to use a Bluetooth headset so that I do not have to hold a 'fist' microphone whilst driving. I have always used a wired remote microphone, with a switch on the gear lever, before ~ but the thought of using a totally wires-free system was quite exciting!

I have fitted the Bluetooth board in the radio and have added the Yaesu speaker microphone that clips around my ear. I have tested it out & it all works fine!

All I have to do now is wait for the new car! Should be Tuesday 24th August.

I'll let you know how I get on with this project.